How to create .tzx files How to dump +3 disks
Note: The full manual can be found on-line here:- Maketzx manual
1) Download Maketzx version 2.33 by RAMSoft from here:- mtzx233.zip
2) Create a directory called maketzx and unzip mtzx233.zip there.
3) Using the tape lead which is supplied with your Spectrum, connect the ear socket of your cassette recorder to the line-in socket of your soundcard.
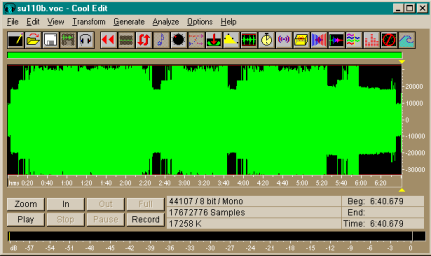
4) Get hold of some sound sampling software. A shareware version of CoolEdit can be downloaded from here:- Cool Edit 2000 (8.24 Mb)
5) Sample the tape using the sampling software
mentioned in part 4. The software should be configured so that the sample is
recorded at a rate of 44100, 8bit resolution and in mono. The volume setting is
important for tapes where the signal is starting to degrade. A good place to
start is to set
the volume to a level where the game can be loaded into a
real Spectrum. The volume can then be adjusted using trial and error. Another
guide is to
set the volume so that the peaks of the sound sample just reach
the top and bottom of the sound sampling window.
6) Once the tape has been sampled, save the sample data to your maketzx directory. The sound should be saved as a soundblaster .voc file for example jetpac.voc.
7) Now you're ready to create a .tzx file. Run
maketzx with the first parameter being the name of the voc file and the second
parameter being the
name of the .tzx file to create for
example:-
maketzx jetpac.voc jetpac.tzx
If the conversion is
successful, the output from maketzx will look something like this :-
-=[ MakeTZX v2.31 ]=- (C) 1998-99 RAMSOFT, a ZX Spectrum demogroup.

Checking input file integrity... ok!
Creative Voice File (VOC) v1.10 EXT, 14378631 bytes (14366326 samples)
Sampling rate: 44107 Hz (playing time: 05:25.715)

Block  1 => Program: JETPAC     - Header: Length=   17, Pause=981ms.
Block  2 => ------------------- - Line=    1, Length=  378, Pause=1998ms.
Block  3 =>   Bytes: JPSP       - Header: Length=   17, Pause=992ms.
Block  4 => ------------------- - Start=16384, Length= 6914, Pause=1790ms.
Block  5 =>   Bytes: 0          - Header: Length=   17, Pause=732ms.
Block  6 => ------------------- - Start=24576, Length= 8194, Pause=1681ms.
Block  7 =>   Bytes: 1          - Header: Length=   17, Pause=988ms.
Block  8 => ------------------- - Start=23424, Length=   17, Pause=1244ms.
Block  9 =>   Bytes: 2          - Header: Length=   17, Pause=250ms.
Block 10 => ------------------- - Start=23728, Length=    3, Pause=308ms.
Block 11 =>   Bytes: 3          - Header: Length=   17, Pause=12ms.
Block 12 => ------------------- - Start=23672, Length=    4, Pause=294ms.

Done!
A successful conversion is normally indicated by the status column consisting entirely of hyphen '-' characters. However, if the signal on the original tape is poor, some of the blocks will contain errors and the output will look like this:-
-=[ MakeTZX v2.31 ]=- (C) 1998-99 RAMSOFT, a ZX Spectrum demogroup.

Checking input file integrity... ok!
Creative Voice File (VOC) v1.10 EXT, 14378631 bytes (14366326 samples)
Sampling rate: 44107 Hz (playing time: 05:25.715)

Block  1 => Program: JETPAC     - Header: Length=   17, Pause=738ms.
Block  2 => ------------------- - Line=    1, Length=  378, Pause=874ms.
Block  3 =>   Bytes: JPSP       - Header: Length=   17, Pause=613ms.
Block  4 => ------------------- ! Chk=OK? (202), Length=   54, Pause=838ms.
Block  5 => F:  0 - Speed: 100% F Chk=ERR (172), Length= 6689, Pause=4ms.
Block  6 =>   Bytes: 0          - Header: Length=   17, Pause=1006ms.
Block  7 => ------------------- - Start=24576, Length= 8194, Pause=1663ms.
Block  8 =>   Bytes: 1          - Header: Length=   17, Pause=984ms.
Block  9 => ------------------- - Start=23424, Length=   17, Pause=2380ms.
Block 10 =>   Bytes: 2          - Header: Length=   17, Pause=985ms.
Block 11 => ------------------- - Start=23728, Length=    3, Pause=307ms.
Block 12 =>   Bytes: 3          - Header: Length=   17, Pause=993ms.
Block 13 => ------------------- - Start=23672, Length=    4, Pause=25903ms.

Done!
In the example above, the loading screen (blocks 4 and 5) have not decoded correctly indicated by the ! and F characters. If the signal is poor, it may be neccesary to use a digital filter during the conversion to correctly extract the data. The command line then would be :- maketzx jetpac.voc jetpac.tzx -f
*** NOTE *** Maketzx includes an option to beautify the output which is enabled using the -b switch. Beautifying the output means that the pauses between the blocks of data is rounded to the nearest 1000ms. This option should NOT be used as the resulting .tzx files are not considered perfect for preservation purposes. Files can only be included in the site if the pause information between blocks is authentic!!
Advanced tips
1) Using the -f option to utilise digital filtering is usually enough to recover difficult blocks but sometimes the signal quality is so bad that the digital filter parameters need adjusting. A different filtering algorithm can be used using -fp2 instead of -f.
2) The default frequency range at which the filter operates is from 600 to 4100 Hz. By using the -ft3 option, the lower frequency setting is lowered to 0. The lower frequency level can also be set using the -fl option. Sometimes a block can be recovered by using different values for the lower frequency level such as -fl100, -fl200 or -fl300 and so on.
3) In some cases, the whole tape image cannot be recovered all at once. In these instances, I recover as much of the tape image as I can then I try and recover the bad blocks individually by re-invoking maketzx using different filtering options and saving the output to a different .tzx file.
For example, if jetpac.voc will not successfully convert in one go no matter which options are used, convert the game in stages, for example you could try the following :-
maketzx jetpac.voc jetpac1.tzx -f
maketzx
jetpac.voc jetpac2.tzx -ft3
maketzx jetpac.voc jetpac3.tzx -fl200
Then use taper version 2.07 to paste in the recovered blocks from jetpac2.tzx and jetpac3.tzx into jetpac1.tzx until a valid .tzx files is created. Taper can be downloaded from here:- taper207.zip
How to make perfect .dsk files from +3 disks on a PC by David Batty
This page outlines the steps you need to take in order to read/write physical +3 three inch disks to/from perfect .dsk files. The .dsk files can then be used on a Spectrum emulator.
Download Ulrich Doevich's excellent freeware utilities CPDread and CPDwrite from: http://www.classicgaming.com/caprice/ or grab them here:
Edit the CPDread configuration file
"cpdread.cfg" to expect;
Tracks = 40 - 45 (depends on disk - use
trial & error)
Drive = A
Sides = 1
Step = 1
Media&Type =
2
Edit the CPDwrite configuration file
"cpdwrite.cfg" to expect;
Tracks = 0
Drive = A
Step =
1
Media&Type = 2
You'll need to make a lead to convert the 3" drive's 24-way male IDC plug to a 34-way male IDC plug like the ones on the back of a 3.5" drive.
You will need a 34-way male IDC plug, a 26-way female IDC socket and a length of ribbon cable. Connect them up as in the diagram below;

If you don't fancy the soldering job then try and get your hands on an Amstrad FD1 external 3" drive from Ebay or a retro dealer. These have the above lead built in.
Open up your +3 (power off!) and unplug the drive from the +3's 26-way connector. Leave the smaller power cable connected to the drive.
Connect your lead to the drive by plugging in the 26-way female socket into the drive, making sure the odd (grounded) pins are along the bottom.
Open up your PC (power off!) and unplug (both) the 3.5" floppy drive(s). Plug the floppy drive "A:" cable from the motherboard into the 34-way male connector above, making sure the red line is orientated as in the diagram.
The floppy drive "B:" connector should remain unconnected.
Turn the +3 on. The drive should whirr up.
Turn the PC on and configure it's BIOS to expect a 360K 5.25" drive on "A:". Disable the "B:" drive. Save & reboot. Don't worry if the floppy drive test fails, and it may sound a bit noisy.
Use CPDread/CPDwrite to read/write the disk to/from a .dsk file.
1. This is the only method of transferring data between +3 disks and .dsk files that can cope with and preserve any commercial disk protection schemes such as Alcatraz +3 (US Gold, Gremlin etc...) or Speedlock +3 (Ocean, Imagine etc...). To be able to store all the unorthodox format data of the commercial protection schemes the .dsk files are in Ulrich Doevich's Extended Dsk Format. The only emulator capable of running ALL of these .dsks is RealSpectrum, with X128 running most of them (with exception of Speedlock +3). If the physical disk has no protection (i.e. +3DOS format) then the corresponding extended .dsk file can be converted into an unextended .dsk file using Pierre Guerrier's XTI (downloadable from the URL above) which ZX32 can handle.
2. .Dsk files which are protected by Speedlock +3 or Three Inch Loader systems cannot be written back to physical disks to work in a +3. This is because the original disks have some sectors written to them by non-CP/M computers, which produce garbage when read by a real +3. These protection systems re-read the garbage sectors, which in an original disk will produce different garbage each time. When the system re-reads a sector written by CPDread it gets the same results each time and crashes itself.
It's not easy to damage your computers carrying out the above, but it's possible. If you decide to go ahead it's at your own risk.